2
Installing the Environment: Part 1
Here's how I installed my whole Application Development Environment for Dot Net Applications from a clean formatted Hard Drive. Take note that the whole thing took about half a day (not including the ISO & update downloads) but of course results may vary. I'm not telling you to reformat your PC~ Just take what you need and leave the rest.
ADE4dotNet Installation Roadmap:
Part 1 ~ Ubuntu 8.10 & ndiswrapper
Part 2 ~ Mono 2.2 & Mono-Develop
Part 3 ~ Hello Worldz!
Let's get this parteh started!
~+~+~+~
Part 1 is all about Ubuntu 8.10, and how to get it running smoothly. Now, why did I choose Ubuntu, and not Linux Mint or Debian? Quite simply because it is statistically the most used Linux Distribution out there, which means that there should be more support people available in case something goes south.
So, first things first: Download the ISO from here (ubuntu.com) then burn it to a cd. If your computer has multiple processors (such as dual or quad core PCs), the 64-bit versions will provide an extra speed boost. I used the 32-bit since my old PC only has a pentium 4 (a single core). ^^
Next, Reboot with the Ubuntu CD in the drive. Hit the F8 or F12 key (depending on your BIOS) to select the CD/DVD-ROM as the boot device. Select your language when asked (Defaults to English), then hit enter on "Install Ubuntu" at the next menu.
Ubuntu is one of the easiest Linux distros to install - in fact, hitting 'Forward' until step 5/7 is common. But lets do this one by one:
Step 1/7 ~ Select your language. The default is English, and If you're reading this FAQ right now, I'm guessing that there's no reason to change the default.
Step 2/7 ~ Select your region. This is for the Time & Weather functions of the system. Pick your city (or the nearest one available, typically your country's capital) then click forward.
Step 3/7~ Select your keyboard. It haas been my expirience that whatever the default selection is usually correct, but if it aint, the normal keyboards are USA, USA - Dvorak and USA - Macintosh.
Step 4/7 ~ Hard Disk Partitioning. The most complicated part in the mix.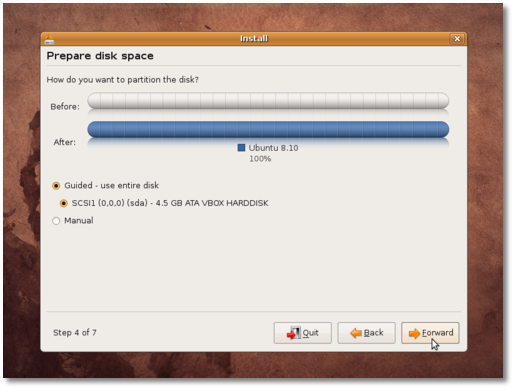 Just hit Guided - use entire disk, then click Forward ^^ eheheheh :) But If you're a bit more adventurous than that, click Manual then create a partition that's 125% of your RAM as a Swap File Partition (I have 2 GB RAM, so my swap partition's 2.5 GB), then reformat the rest as an ext3 file system for Ubuntu. That would be the optimum configuration for a clean install.
Step 5/7 ~ Who are You? Just fill up the forms, and make sure your passwords are secure. Unless you're absolutely sure you know what you're doing, avoid checking the 'Log In Automatically' option at the bottom.
Step 6 & 7 ~ Just hit Forward then Install. ^^ It should take 10~20 minutes before your PC restarts, then boots up to the familiar ubuntu desktop.
Of course, the next logical step is to update Ubuntu and make sure all the hardware are working. Check them out one by one ~ I didn't really have any problems (except for one, which I'll tackle in a bit). Ubuntu detected my Graphics Card & Monitor, automatically resized the desktop for maximum resolution (1366x768). The sound card & speakers worked without any configuration, and the bluetooth dongle didn't need to be installed (like in windows) and the CD/DVD drive burned disks out of the box without any driver installs.
However, I can't update without internet, and Ubuntu didn't detect my WiFi Ethernet Card. If you also encountered this problem, here's how to resolve it.
1.) Insert the Ubuntu CD back to you CD Drive.
2.) Search for the deb files, ndiswrapper & ndiswrapper-util.
3.) Install ndiswrapper-util first by double clickin' it, then clickin' Install Package at the dialog box.
4.) Install ndiswrapper (exactly the same way as above)
5.) Go to System ~ Administration ~ Windows Wireless Drivers
6.) Click "+ Install New Driver" then search for the .inf file at your WiFi Card's bundled CD. Use the drivers meant for XP though I'm not sure why the Vista version drivers aren't working for me.
7.) Click close, then reboot. Ubuntu should detect your WiFi network now! ^^
I guess that's that for Part 1! If you have any questions, suggestions or comments, just click the post it note at the right side of this post's title! Tommorow, I'll post part 2, which is all about Mono and Mono Develop, until then, Ciao~! ^^
ADE4dotNet Installation Roadmap:
Part 1 ~ Ubuntu 8.10 & ndiswrapper
Part 2 ~ Mono 2.2 & Mono-Develop
Part 3 ~ Hello Worldz!
Let's get this parteh started!
~+~+~+~
Part 1 is all about Ubuntu 8.10, and how to get it running smoothly. Now, why did I choose Ubuntu, and not Linux Mint or Debian? Quite simply because it is statistically the most used Linux Distribution out there, which means that there should be more support people available in case something goes south.
So, first things first: Download the ISO from here (ubuntu.com) then burn it to a cd. If your computer has multiple processors (such as dual or quad core PCs), the 64-bit versions will provide an extra speed boost. I used the 32-bit since my old PC only has a pentium 4 (a single core). ^^
Next, Reboot with the Ubuntu CD in the drive. Hit the F8 or F12 key (depending on your BIOS) to select the CD/DVD-ROM as the boot device. Select your language when asked (Defaults to English), then hit enter on "Install Ubuntu" at the next menu.
Ubuntu is one of the easiest Linux distros to install - in fact, hitting 'Forward' until step 5/7 is common. But lets do this one by one:
Step 1/7 ~ Select your language. The default is English, and If you're reading this FAQ right now, I'm guessing that there's no reason to change the default.
Step 2/7 ~ Select your region. This is for the Time & Weather functions of the system. Pick your city (or the nearest one available, typically your country's capital) then click forward.
Step 3/7~ Select your keyboard. It haas been my expirience that whatever the default selection is usually correct, but if it aint, the normal keyboards are USA, USA - Dvorak and USA - Macintosh.
Step 4/7 ~ Hard Disk Partitioning. The most complicated part in the mix.
Just hit Guided - use entire disk, then click Forward ^^ eheheheh :) But If you're a bit more adventurous than that, click Manual then create a partition that's 125% of your RAM as a Swap File Partition (I have 2 GB RAM, so my swap partition's 2.5 GB), then reformat the rest as an ext3 file system for Ubuntu. That would be the optimum configuration for a clean install.Step 5/7 ~ Who are You? Just fill up the forms, and make sure your passwords are secure. Unless you're absolutely sure you know what you're doing, avoid checking the 'Log In Automatically' option at the bottom.
Step 6 & 7 ~ Just hit Forward then Install. ^^ It should take 10~20 minutes before your PC restarts, then boots up to the familiar ubuntu desktop.
Of course, the next logical step is to update Ubuntu and make sure all the hardware are working. Check them out one by one ~ I didn't really have any problems (except for one, which I'll tackle in a bit). Ubuntu detected my Graphics Card & Monitor, automatically resized the desktop for maximum resolution (1366x768). The sound card & speakers worked without any configuration, and the bluetooth dongle didn't need to be installed (like in windows) and the CD/DVD drive burned disks out of the box without any driver installs.
However, I can't update without internet, and Ubuntu didn't detect my WiFi Ethernet Card. If you also encountered this problem, here's how to resolve it.
1.) Insert the Ubuntu CD back to you CD Drive.
2.) Search for the deb files, ndiswrapper & ndiswrapper-util.
3.) Install ndiswrapper-util first by double clickin' it, then clickin' Install Package at the dialog box.
4.) Install ndiswrapper (exactly the same way as above)
5.) Go to System ~ Administration ~ Windows Wireless Drivers
6.) Click "+ Install New Driver" then search for the .inf file at your WiFi Card's bundled CD. Use the drivers meant for XP though I'm not sure why the Vista version drivers aren't working for me.
7.) Click close, then reboot. Ubuntu should detect your WiFi network now! ^^
I guess that's that for Part 1! If you have any questions, suggestions or comments, just click the post it note at the right side of this post's title! Tommorow, I'll post part 2, which is all about Mono and Mono Develop, until then, Ciao~! ^^
